Post by Robinm on Nov 16, 2016 11:19:01 GMT
The car in this guide is a '93 MK1, earlier and later cars will be very similar as will be the MK2. The MK3 is completely different.
Tools needed:
Cross head screwdriver
13/14mm sockets
10mm socket and ideally a nut driver on an electric screwdriver.
This is quite a straightforward job and nothing to be scared of, having an assistant will be useful in carrying the hood/frame on and off the car, it's surprisingly heavy.
If you're small like me you won't need to remove the seats but if you're big it'll definitely be beneficial, the seats are held in with four 14mm head bolts and can be very tight to undo. If leaving the seats in, push them all the way to the front and tip them forwards.
If you have a tall solid aerial (the original ones which didn't go down) unscrew it with a 10mm spanner. If you have a heated glass back window, unplug it.
Start with the hood down.
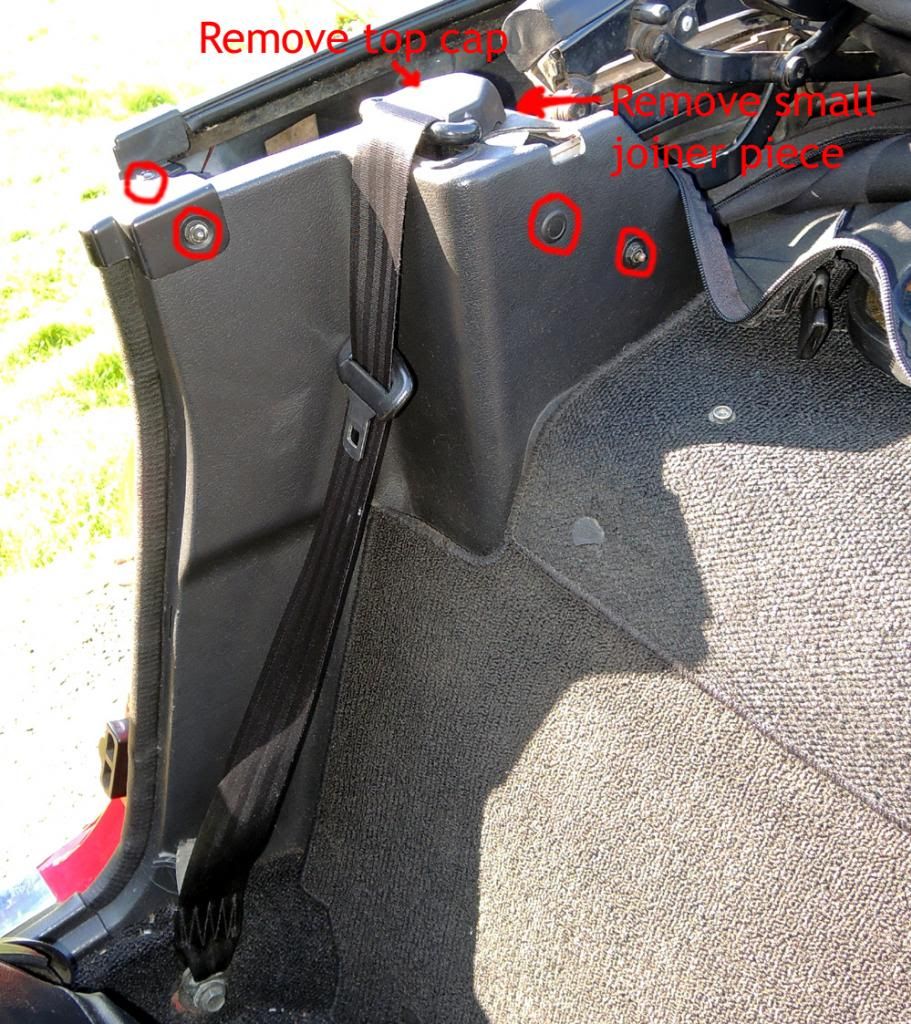
First you'll need to remove the plastics around the seat belt towers, undo the two 10mm nuts used to locate the tonneau cover, pop out the small plastic fastening also extract the small plastic tab which secures the two sides together at the top, under the seat belt swivel. Undo the single screw and remove the metal top cap at the front.
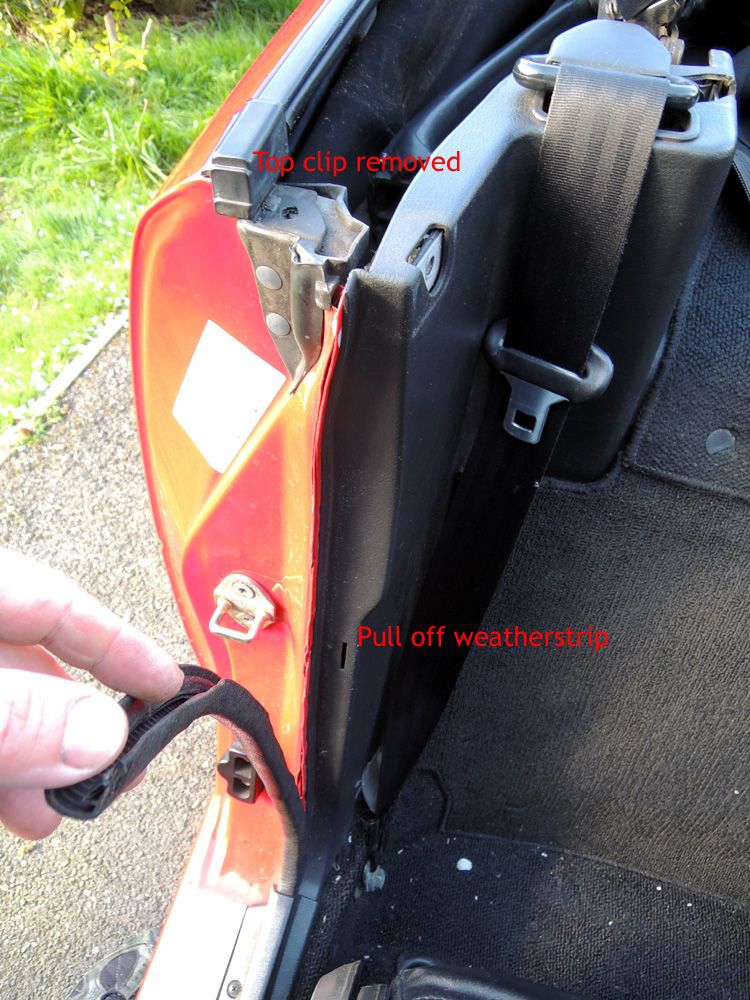
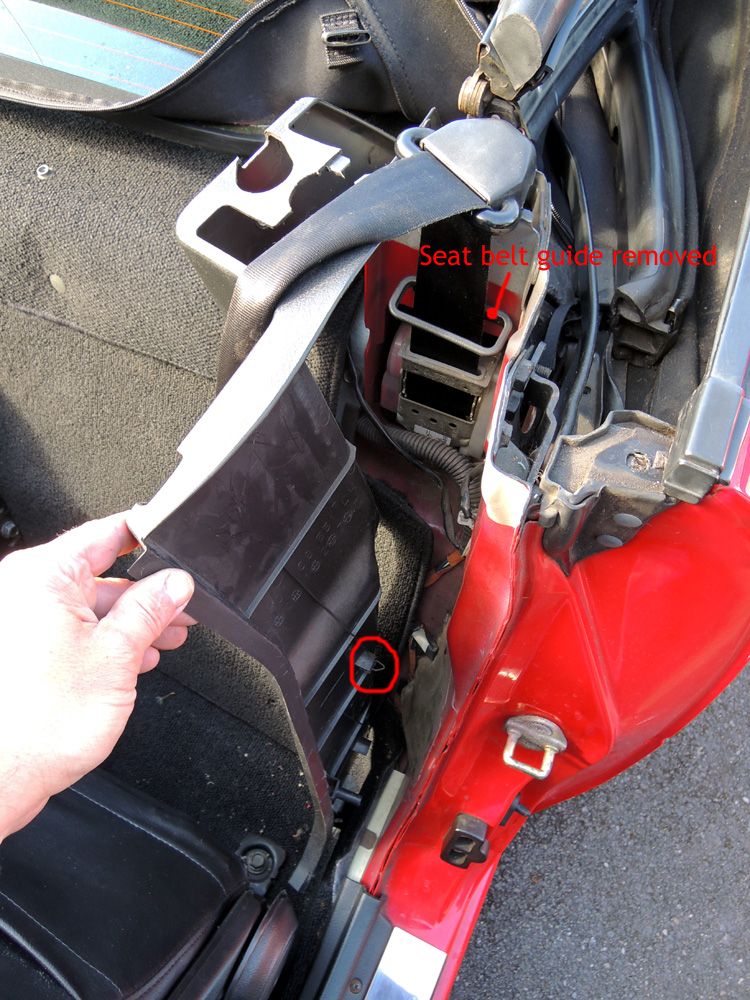
There's a rectangle of plastic which can be unclipped and dropped down which the seat belt gets guided through. Pull back the weather strip and lift it out of it's base.
If you have a brace bar fitted (post '93) remove this as well, pop the caps off and undo the nut each side.
There's just one internal clip holding the seat belt tower cover on, carefully tug the plastic panel which can now be pulled off.
Now put the hood back up but don't fasten it at the front, just leave it forwards but unclipped.
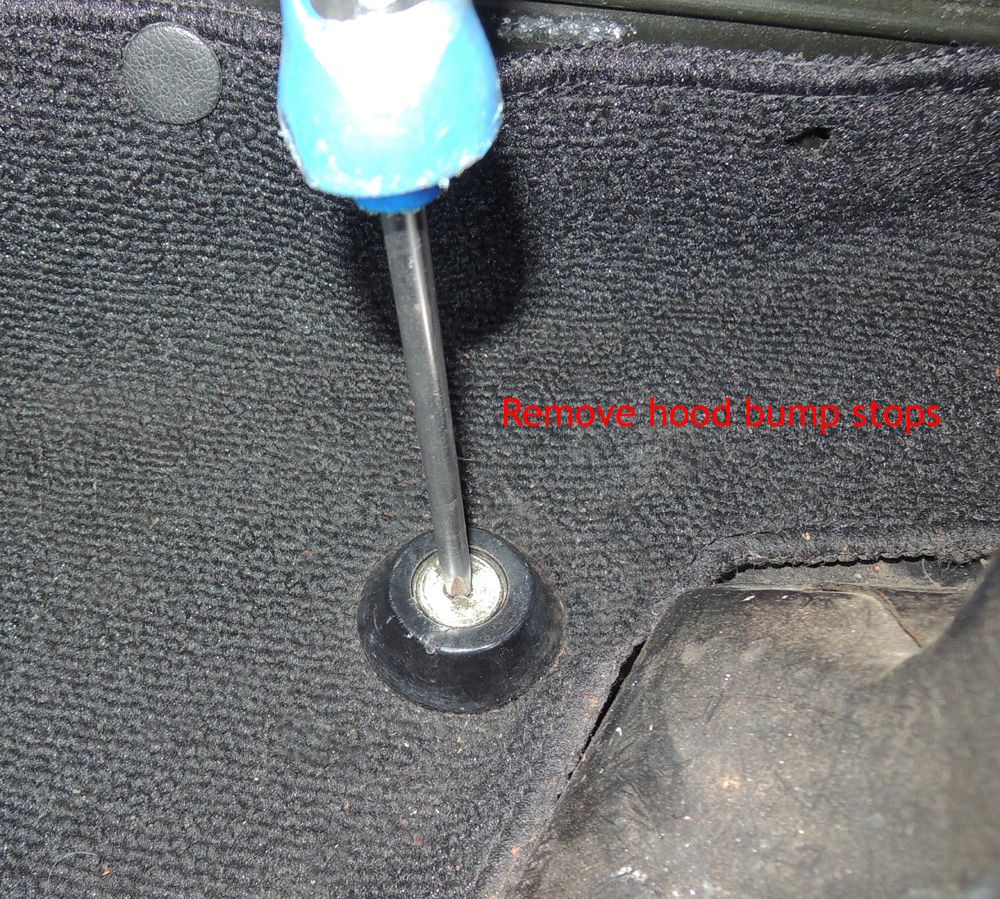
Around the back of the seat belt towers remove the two hood stops either side.
Using you wife's best cutlery find a strong fork, this is for removing the carpet clips, they only push in but can take some force to remove, a fork is ideal for these as it rarely damages them.
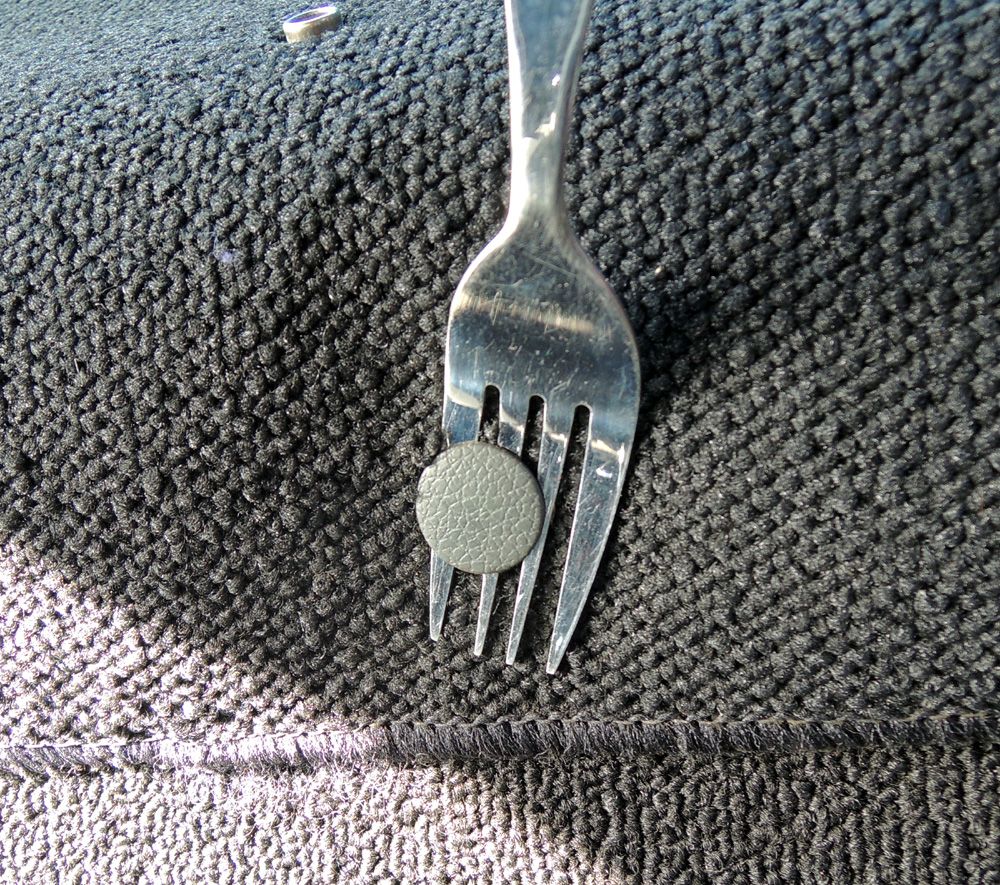
Pop out all of the carpet clips, across the front and all around the back, two are hidden down the sides. Putting all of the pieces you take off in the cubby box is a good idea, keeps them close to hand and saves you losing any. Remove the shelf carpet completely.
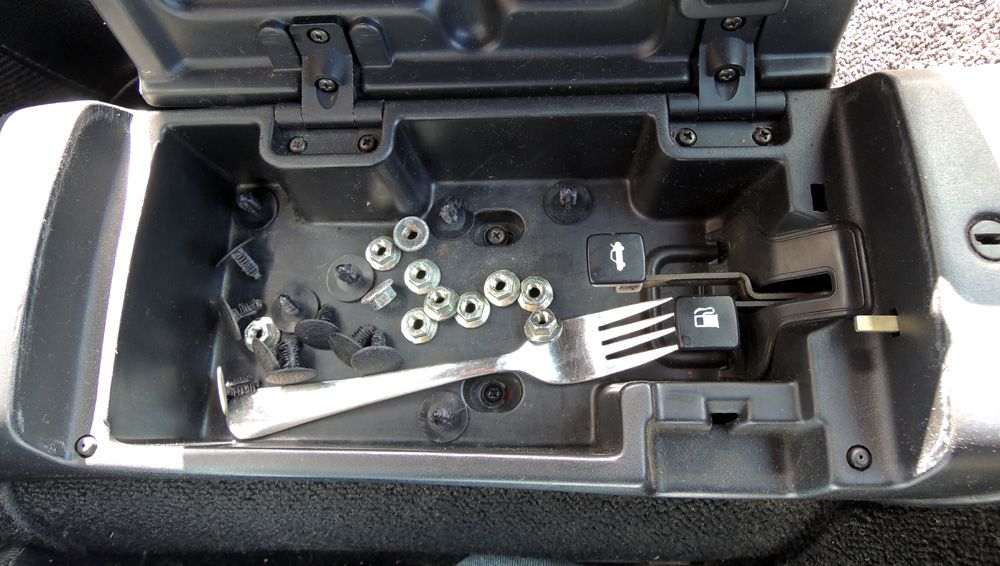
This reveals the three rain rail retainers, these are three 'U' shaped channels which hold the roof tightly to the car all the way around the back. There are 13 10mm nuts to undo, this is why an electric screwdriver/nut driver is useful to save time and your wrists. Undo all 13 nuts and put them in the cubby box.
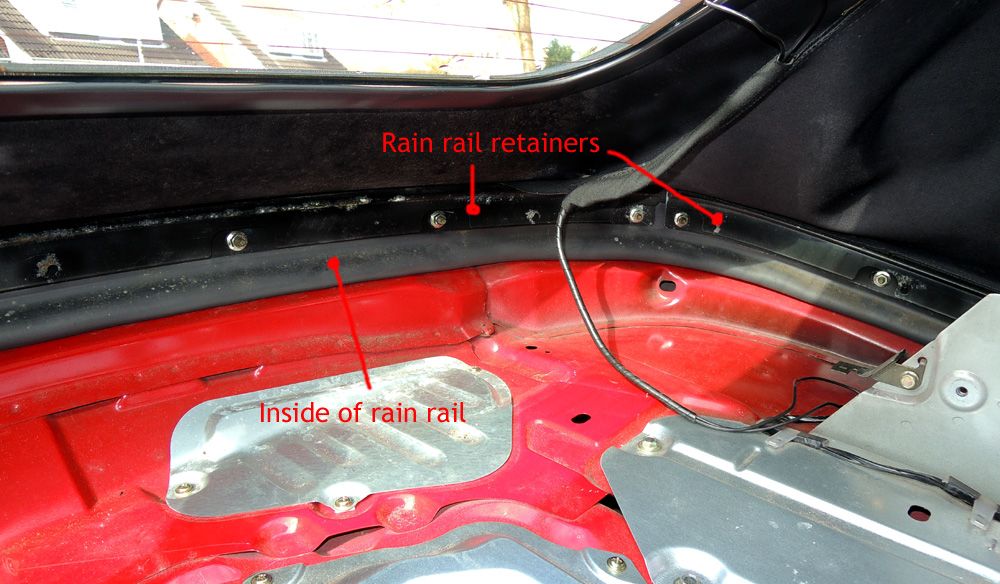
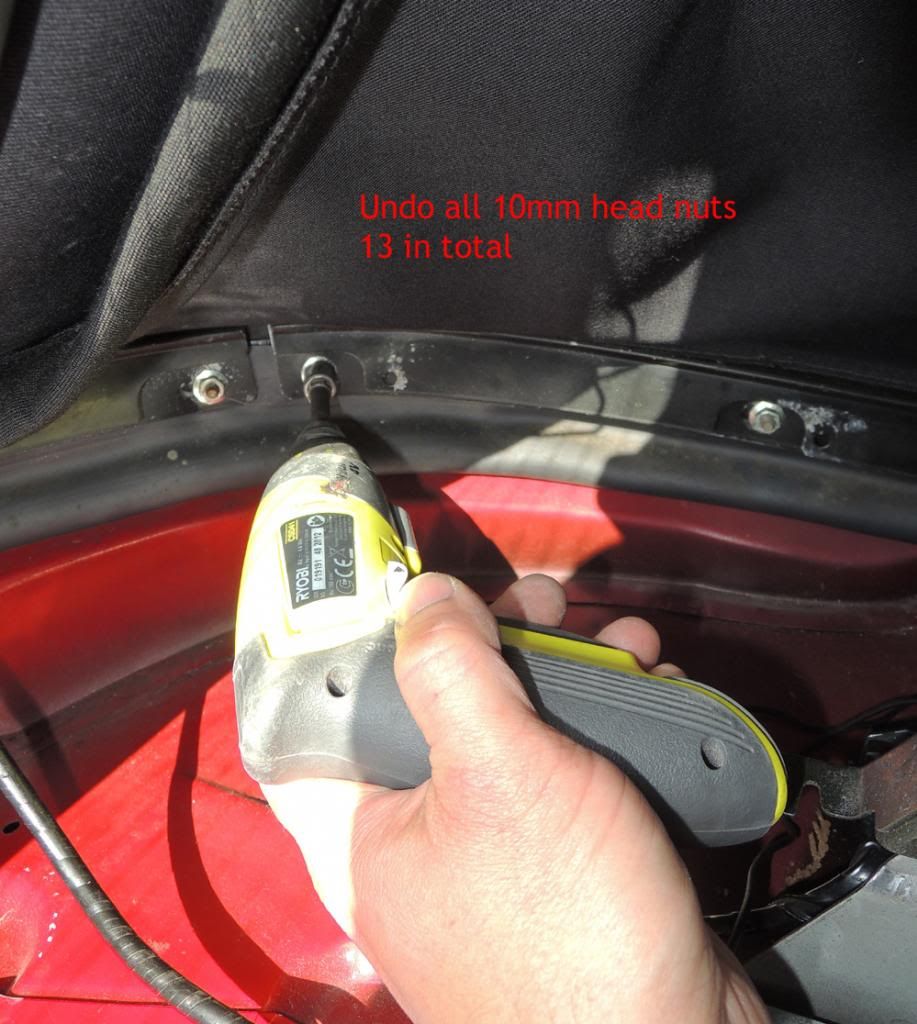
Now the rain rail retainers can be pulled off, sides first and then the larger rear one.
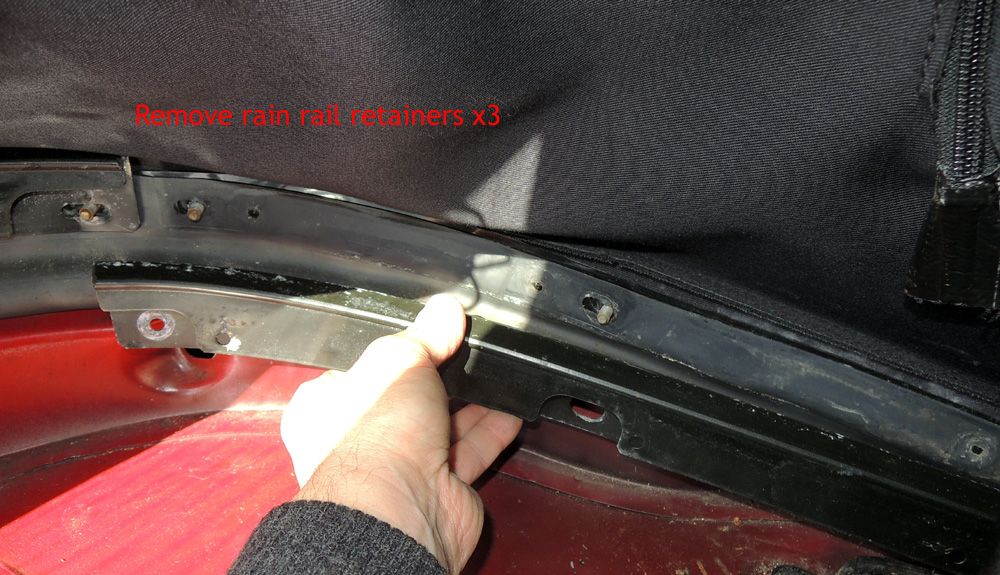
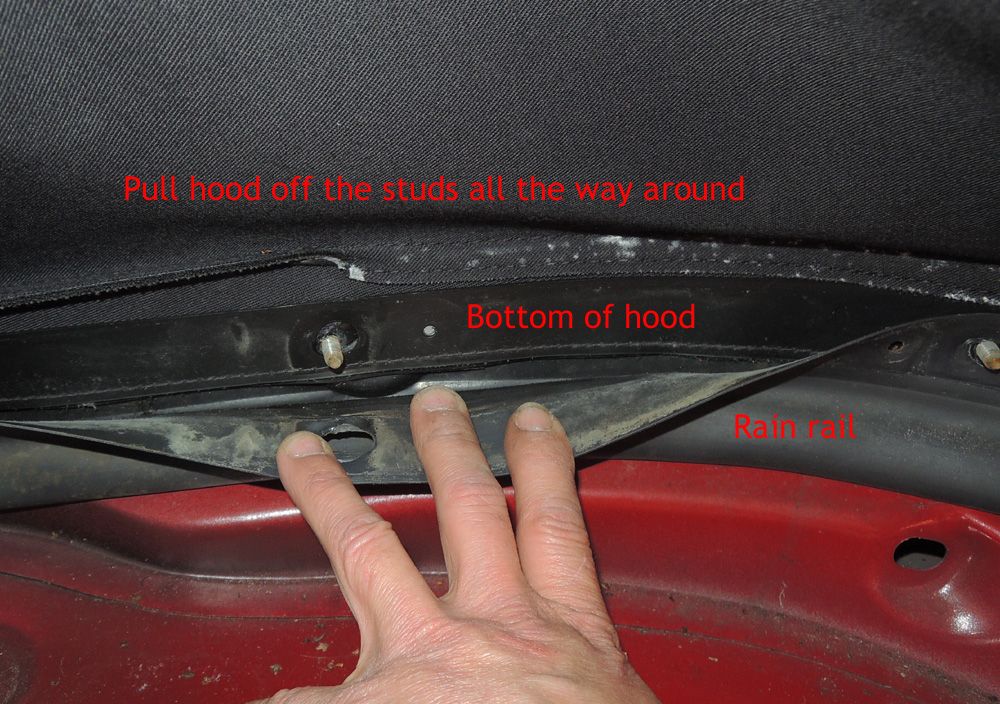
If you pull back the rubbery back of the rain rail you can see the bottom of the hood itself, if you want to leave the rain rail on the car and not disturb it the hood can be pulled off the studs using this method, pull the rubber back, carefully tease the hood from it's studs all the way around the back.
When the hood is clear from the studs all the way around the back undo the three 13mm bolts either side which hold the frame to the car.
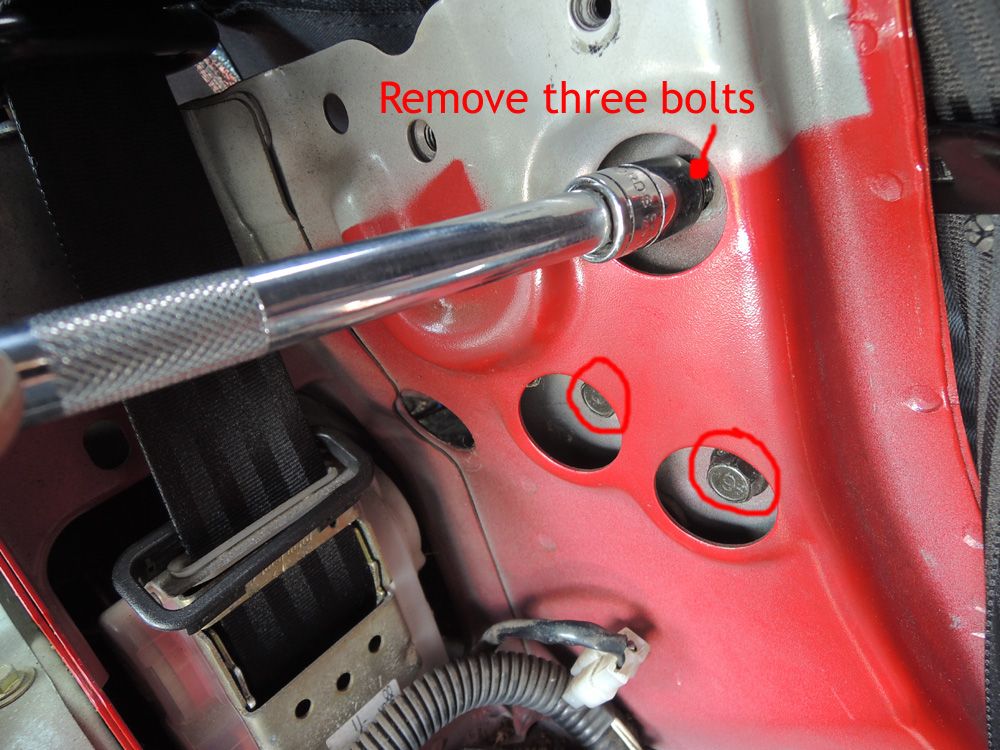
When these are undone the hood is just sitting on two locating studs each side but nothing is holding it onto the car at all, with the hood in it's closed position still and with the help of an assistant (standing either side of the car) lift the hood frame up and walk backwards to clear the car (hope you remembered the aerial) please note: this is not easy on your own..
Rain rail refurbishment link:link (follow this link to the separate rain rail removal/waterproofing and re-fitting guide if needed)
Refitting.
In the great tradition on Haynes manuals it's tempting to say fitting is the reverse of removal but this isn't exactly the case.
Now is a great time to clear your drains, you'll never have such clear access as now to give the drains and trays a thoroughly good clean up.
The rain rail is removed in this pic.
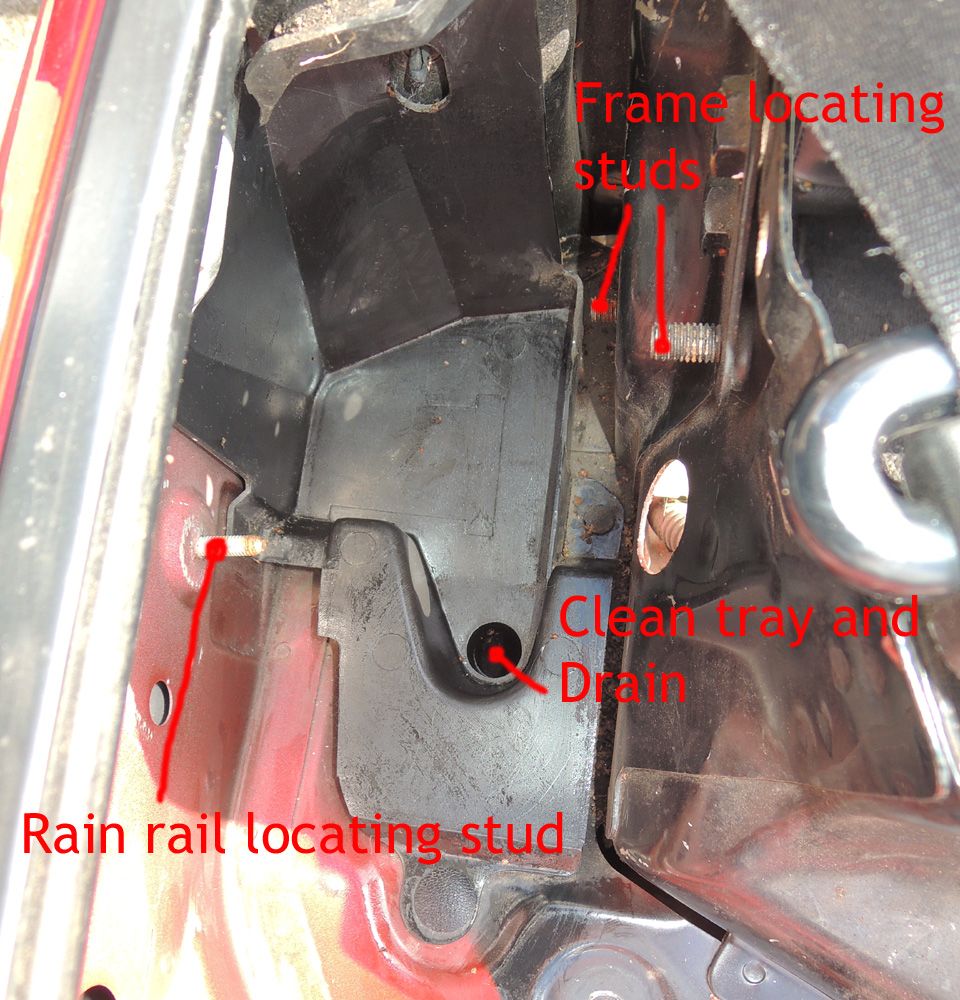
With an assistant lift the new hood frame onto the car from the back, the hood has to be in it's fully forwards closed position to do this as then the two locating lugs will be in the right position, you'll know it's in position when the three bolt holes either side line up, refit the bolts.
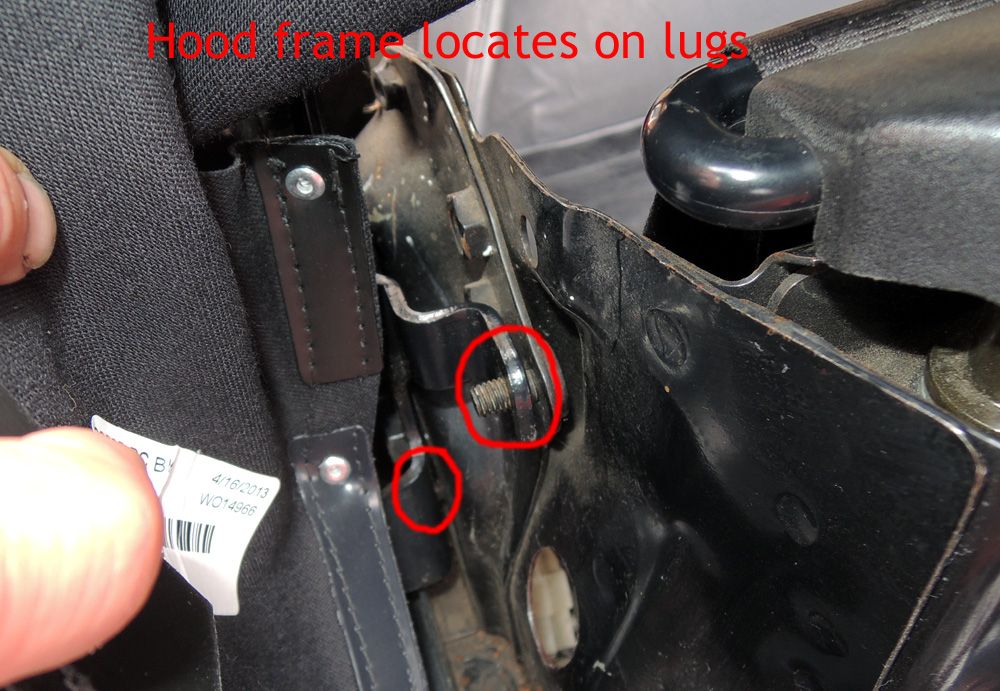
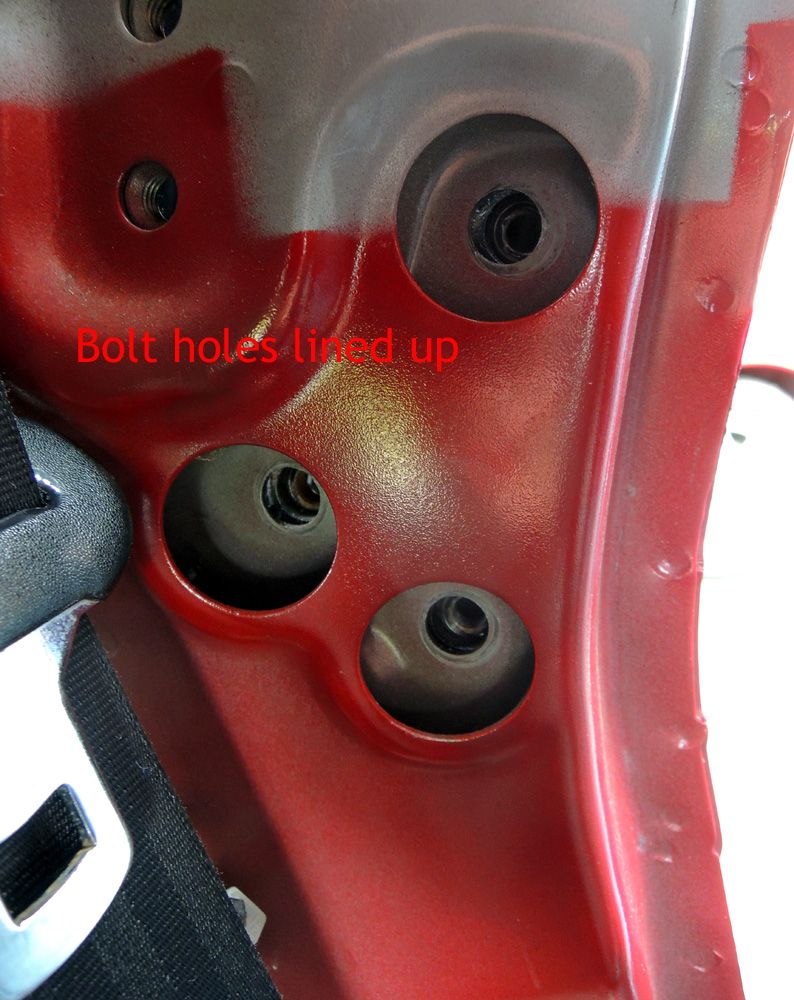
Don't clip the front of the hood yet, fitting the hood inside the rain rail is now the next challenge..
Starting at the centre pull the rubber flap of the rain rail down and push the hood onto the centre stud at the back, then work evenly down both sides, you'll probably find that an assist and holding the hood halfway open will help getting the hood back onto the studs around the sides (especially with a brand new hood).
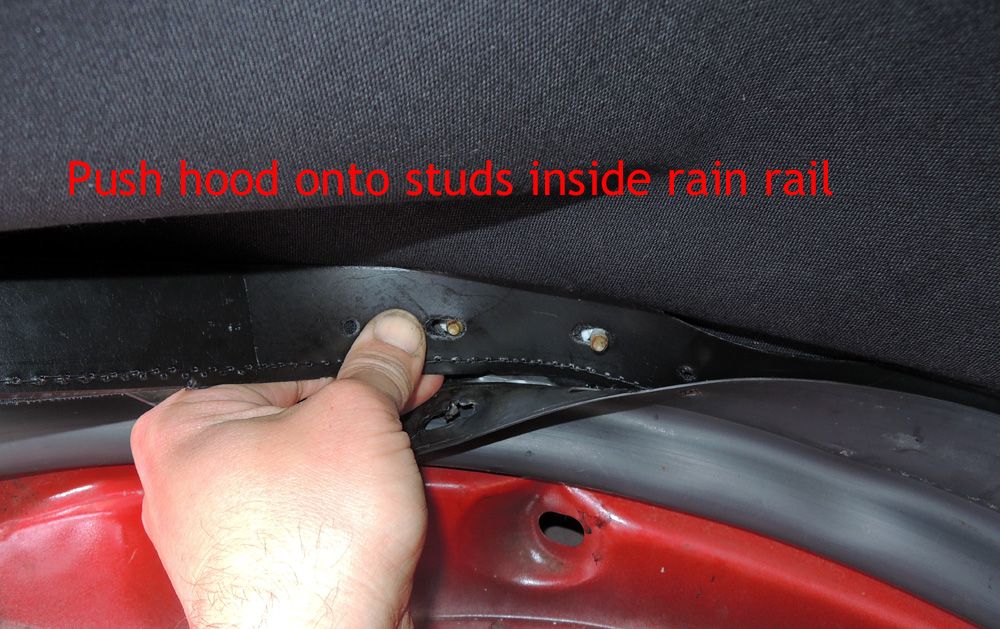
When the hood is located on the studs all around the back the rain rail retainers can be refitted, refer to the chart for the sequence of tightening them in stages. The side rain rail retainers are 'handed' and can't be fitted in the wrong place or upside-down.
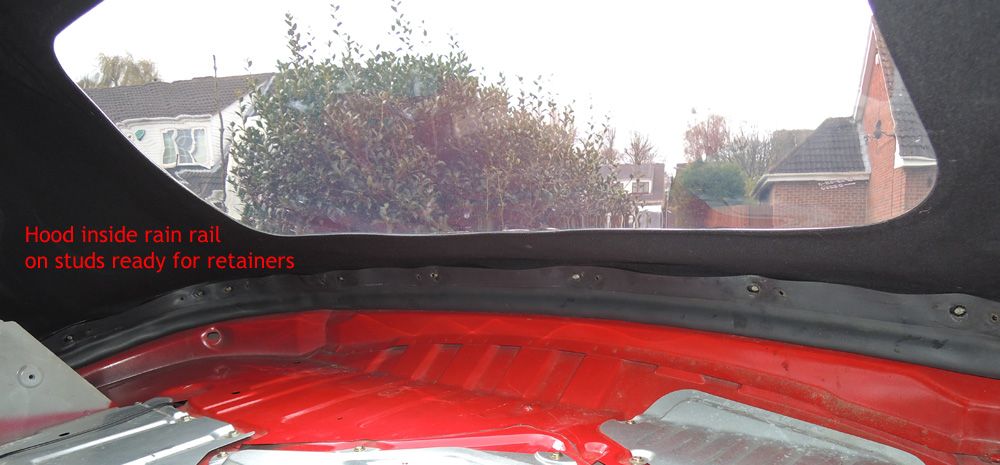
If you have a glass back window don't forget the window supporting straps which go onto the studs as per the diagram below.
Tighten the rain rail carefully:
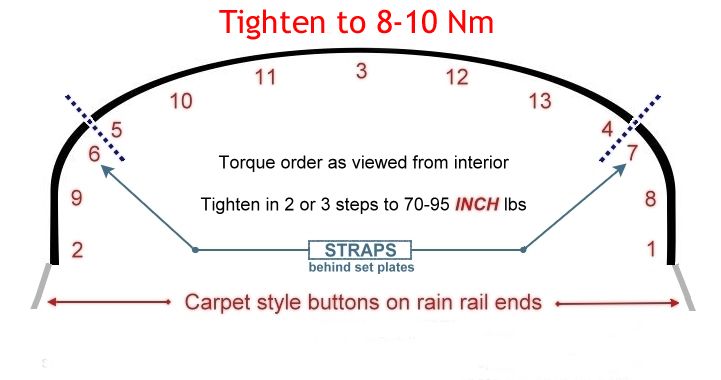
Once you have refitted the three retainers and are sure the rain rail is secured you can clip the front of the roof on, if this is a new hood this'll be easier said than done, you'll have to back the hood catch adjusters right off (with catch fully open pull down the inner plastic and turn the long nut until they are fully extended).
It'll take a warm sunny day, an assistant pushing the hood forwards and some brute force/patience to get it latched the first time, used hoods will probably just need a small adjustment of the catches. New hoods need the material to stretch into position, this is why they are hard to close the first time.
Leave the carpet off the back shelf for now as I suggest sprinkling some water from a hose or watering can around the back of the hood to make sure no water appears on the shelf.
Once you're happy it's sealed, refit the plastics around the seat belt towers, the carpet and hood stops, all the parts you took off.
You're done
Tools needed:
Cross head screwdriver
13/14mm sockets
10mm socket and ideally a nut driver on an electric screwdriver.
This is quite a straightforward job and nothing to be scared of, having an assistant will be useful in carrying the hood/frame on and off the car, it's surprisingly heavy.
If you're small like me you won't need to remove the seats but if you're big it'll definitely be beneficial, the seats are held in with four 14mm head bolts and can be very tight to undo. If leaving the seats in, push them all the way to the front and tip them forwards.
If you have a tall solid aerial (the original ones which didn't go down) unscrew it with a 10mm spanner. If you have a heated glass back window, unplug it.
Start with the hood down.
First you'll need to remove the plastics around the seat belt towers, undo the two 10mm nuts used to locate the tonneau cover, pop out the small plastic fastening also extract the small plastic tab which secures the two sides together at the top, under the seat belt swivel. Undo the single screw and remove the metal top cap at the front.

There's a rectangle of plastic which can be unclipped and dropped down which the seat belt gets guided through. Pull back the weather strip and lift it out of it's base.
If you have a brace bar fitted (post '93) remove this as well, pop the caps off and undo the nut each side.
There's just one internal clip holding the seat belt tower cover on, carefully tug the plastic panel which can now be pulled off.


Now put the hood back up but don't fasten it at the front, just leave it forwards but unclipped.
Around the back of the seat belt towers remove the two hood stops either side.

Using you wife's best cutlery find a strong fork, this is for removing the carpet clips, they only push in but can take some force to remove, a fork is ideal for these as it rarely damages them.

Pop out all of the carpet clips, across the front and all around the back, two are hidden down the sides. Putting all of the pieces you take off in the cubby box is a good idea, keeps them close to hand and saves you losing any. Remove the shelf carpet completely.


This reveals the three rain rail retainers, these are three 'U' shaped channels which hold the roof tightly to the car all the way around the back. There are 13 10mm nuts to undo, this is why an electric screwdriver/nut driver is useful to save time and your wrists. Undo all 13 nuts and put them in the cubby box.


Now the rain rail retainers can be pulled off, sides first and then the larger rear one.

If you pull back the rubbery back of the rain rail you can see the bottom of the hood itself, if you want to leave the rain rail on the car and not disturb it the hood can be pulled off the studs using this method, pull the rubber back, carefully tease the hood from it's studs all the way around the back.

When the hood is clear from the studs all the way around the back undo the three 13mm bolts either side which hold the frame to the car.

When these are undone the hood is just sitting on two locating studs each side but nothing is holding it onto the car at all, with the hood in it's closed position still and with the help of an assistant (standing either side of the car) lift the hood frame up and walk backwards to clear the car (hope you remembered the aerial) please note: this is not easy on your own..
Rain rail refurbishment link:link (follow this link to the separate rain rail removal/waterproofing and re-fitting guide if needed)
Refitting.
In the great tradition on Haynes manuals it's tempting to say fitting is the reverse of removal but this isn't exactly the case.
Now is a great time to clear your drains, you'll never have such clear access as now to give the drains and trays a thoroughly good clean up.
The rain rail is removed in this pic.

With an assistant lift the new hood frame onto the car from the back, the hood has to be in it's fully forwards closed position to do this as then the two locating lugs will be in the right position, you'll know it's in position when the three bolt holes either side line up, refit the bolts.


Don't clip the front of the hood yet, fitting the hood inside the rain rail is now the next challenge..
Starting at the centre pull the rubber flap of the rain rail down and push the hood onto the centre stud at the back, then work evenly down both sides, you'll probably find that an assist and holding the hood halfway open will help getting the hood back onto the studs around the sides (especially with a brand new hood).

When the hood is located on the studs all around the back the rain rail retainers can be refitted, refer to the chart for the sequence of tightening them in stages. The side rain rail retainers are 'handed' and can't be fitted in the wrong place or upside-down.

If you have a glass back window don't forget the window supporting straps which go onto the studs as per the diagram below.
Tighten the rain rail carefully:

Once you have refitted the three retainers and are sure the rain rail is secured you can clip the front of the roof on, if this is a new hood this'll be easier said than done, you'll have to back the hood catch adjusters right off (with catch fully open pull down the inner plastic and turn the long nut until they are fully extended).
It'll take a warm sunny day, an assistant pushing the hood forwards and some brute force/patience to get it latched the first time, used hoods will probably just need a small adjustment of the catches. New hoods need the material to stretch into position, this is why they are hard to close the first time.
Leave the carpet off the back shelf for now as I suggest sprinkling some water from a hose or watering can around the back of the hood to make sure no water appears on the shelf.
Once you're happy it's sealed, refit the plastics around the seat belt towers, the carpet and hood stops, all the parts you took off.
You're done


 Sounds like a very cool cat though
